Monday, December 23, 2013

Bags...bags...

 Cross-body bag all finished!  I started making this one with just an idea in mind, no pattern.
I started out with the front/back of the bag, then made the sides (4 dc's wide) attaching the metal square-rings for the strap.  I then added a top flap to cover the zippered top (just rows of sc's edged with sc's) and made a lining out of blue minky fabric.  Adding the owl with a few stitches and it's done!  The last Christmas gift made!

Inside the flap, zippered lining


I've been making a lot of zippered makeup bags.  
This Seattle print fabric is one of my favorites!  It showcases highlights of the area so brightly!


Tuesday, December 17, 2013

Bits & Bobs into a girls bag!

Awhile back I found this pattern for a cute hooked Hearts Afghan and pulled out my red yarn, creating one of the squares.  I knew that I didn't want to create a full-sized blanket out of the pattern, so I tucked the square aside until the "right project" popped into my mind.  So yesterday I pulled out all my bits & bobs of yarn colors and tackled that "right project"! 
 I made a fully-lined with a zipper and everything bag for our youngest niece!


 The ubber cuteness almost got to me ;)  
but I love how cheery and bright it turned out!


My Girls Hooked Bag Tutorial O' Sorts:
I took my red heart square, sl st my red yarn into the bottom corner (red puffy heart/right side up!) hook 1 row sc, 4 rows dc, 1 row sc. (This is the base rows of the bottom of the bag).  Next continue on hooking the back of the bag with 30 rows of hdc's.  (When near the end I count to make sure the front and back are even!)


There you have it, a front/base/back of the bag.  
I started this in the evening thus the darker photos, but you can get the idea! 


Next I picked out a cornflower blue shade to create the bag strap. 
I created it 4 dc's wide and 24 inches long.


Now to attach the strap to the bag.  
I knew that I wanted the bubblegum pink as a trim 
so I used this as my yarn to piece it together.   
SLST into the bottom corner of the base, then sc around
 (4 sc's for the base bottom, adding an extra 2 sc's in each of the corners, and continuing up the side of the bag front.)  
Once you are at the top corner, 
continue with sc's across the top of the bag.


Continue down the other side, attaching the strap 
and making sure you don't have the handle twisted!  
I pinned it to the base bottom of the opposite side
 so I knew exactly where it would meet at the top right of the bag.
Keep attaching the handle to the bag with sc's around, 
up the other side of the handle and back of bag.  
SLST to beginning sc. 


 Next I created a zipper placket for the top of the bag.  
SLST your color onto the top corner, sc in same sp.  
Then hdc around in each stitch, with 4 hdc's in each end.  
It ends up looking like a long rectangle box.  
Now do any trims or designs to your bag that you would like.  Doing it now keeps all the ends inside the bag 
and not a hassle later after your lining is inside!  
I took white yarn and created cross-stitch pattern around the heart. 
And a row of slst border around the heart in lavender. I also took a sky blue and trimmed the handle with sc's.


This is what it looks like when finished:


Now you have a nice placket to attach your zipper to, 
making it all pretty and hidden! 


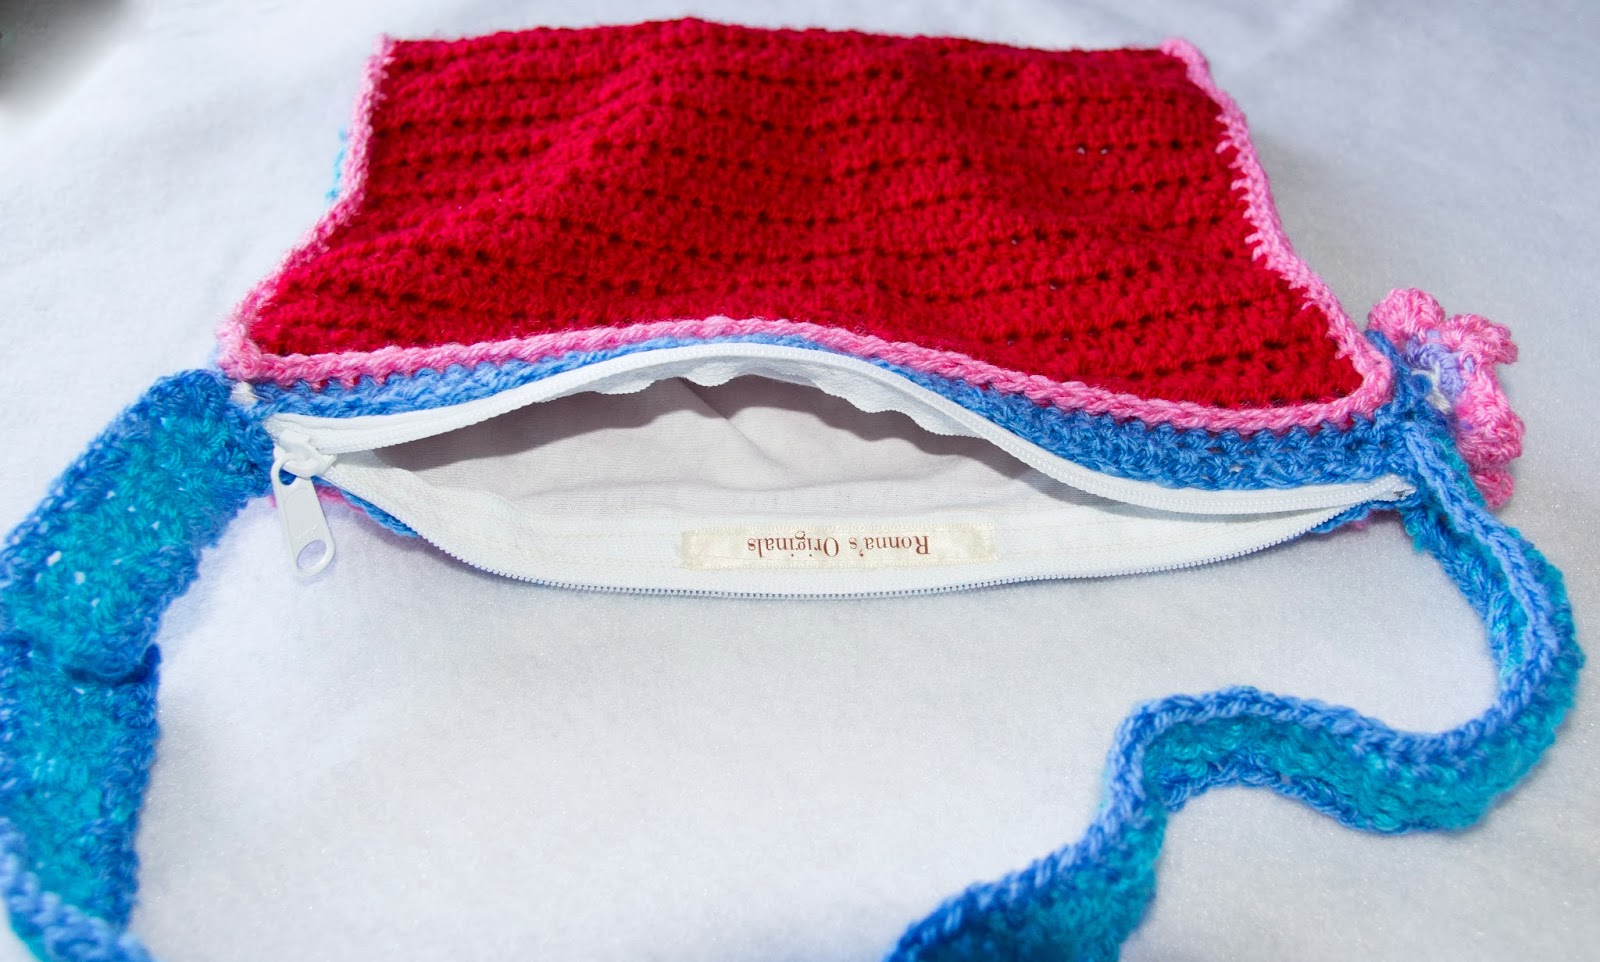
 Next take out your lining material.  
I used basic white cotton and a large white zipper.


 Make this as you would any bag or bag lining.  
(There are lots of tutorials out there if you need help! Some day I promise I will get to making a tut on a basic bags!)

 So just remember, you want the inside of this bag lining to be "pretty seams" and the outside is okay showing  seam ends as it will be inside the hooked bag.
 I squared off the bottoms of the lining, and added my label to the inside of the zipper lining.


Next slide your lining inside of the hooked bag and pin in place.  Hand sew it to the top of the blue rows of hdc's all the way around, giving it some extra attention at each end.  Make sure you keep your hdc's below the zipper line so it won't get stuck inside the zipper when using!


 Next add on any trims you would like.  
I made a basic flower and added a hooked heart to it's center.


 And all done!  I love how cutsie and girly it turned out!


Monday, December 16, 2013

Christmas Snowflakes


The end of Fall here in Seattle has given way 
to many days just like this...


Snowflakes...and more snowflakes...and even more snowflakes!


Earrings, buttons, pins, ornaments, and gift tags!


These make quick & easy gifts, yet they are so cute & unique! 
A love for anyone who loves handmade things.  I love to add a snowflake pin onto my scarf, or to the front of my hat...it adds a bit more of Christmastime to my winter garb!

There are so so so many crochet patterns out there for snowflakes.  I found these on Red Heart yarns   free patterns.  
To create into earrings just add your earring hook onto one of your last rows of points. Or sew on your pin hardware to the back of a snowflake.  I then pin them out and starch them overnight. 


Friday, December 13, 2013

Eye Masks!

I love all the spa and bath gift sets that come out at Christmas time...
but if you are like me, some of them just do not have "just enough" in them for a great gift.
I like to add a few little things to mine to give them a little extra handmade touch.
Sometimes a few scrubby hooked washcloths or bathmitts, or a pair of hooked slippers.
This year I decided to use some of my hooked bits of Irish Crochet and create some eye masks.
Easier to make than I first thought too!
Awhile back I made some superhero eye masks and I kept thinking to use the same method and create some spa-style masks for the ladies in my life.  Finally I did!
I love how they turned out!  And mmm...I filled them with lavender grown, harvested, and dried by myself!  A full circle gift :)


Eye masks are really simple! (There are a ton of tut's out there for those who need photos to follow-along or a more in-depth tut!) I do have some red silk and black hooked lace that I'll be creating next so I'll be sure to do photos for some help!

Here is what I did:
Draw your template on a piece of paper or cardboard.  Cut out your front/back and batting pieces from it.  I take my batting then and sew around the 3 sides, leaving one open to insert the lavender, then sew up the forth side.  On the front piece of fabric, I pinned my hooked lace and then basted it on, making sure that the front side of the fabric was facing upwards. Next I cut a piece of fabric for my elastic "sleeve", making sure it was long enough for a head-size, and basted it to the front piece on each side.  Next I laid the back piece on top of the front piece, right sides together, pin it and sew around the sides and bottom while being careful for the elastic inside. Leave the top open about 4 inches for turning.  Turn it right side out, press the back (being careful with the lace), push the corners out, and then slide the batting inside.  Sew up the top opening and done!  Easy and yet a beautiful gift! 

Sunday, December 1, 2013

Girls Vests!


I love love love Cascade Yarns Pima Cotton, 
it is so unbelievably soft and yet light-weight.
I received this pretty soft lavendar yarn for my birthday and 
knew that I wanted to create something for our 3 nieces with it.  
I had recently finished the Hooded Weekend Sweatshirt and thought about using that basic netting pattern for vests.  
I have to say, that they turned out so cute! 


Details:
I followed the pattern creating the front and back, not finishing off but continuing into connecting the side I was on. SC into one side, SC into the other until I was up to the armpit area. Next I went around the armhole with sc, ch1, sc, ch3. Then the 6sc's in each ch3 space. I finished off there and reattached at the next side, using the same method. Then onto the neck and bottom row. Adding in a button and button loop on one vest, a pretty basic flower and pearl button on the other.


Our youngest niece wanted an owl on hers, so I used an owl button and on the other I did a basic flower with a pearl button.


One more niece...so back to the yarn I go! 

This one I created using Cascade Yarns 220 Superwash Quatro Wool in aqua.   I added a row of sc trim at the edge of the sleeves in Deborah Norville's Serentity Garden Yarn in hydrengea. 

I love this pattern!


I found this pattern on Craftsy and knew that I had to give it a try! 
I am SOOO happy that I did!
Not only is it easy peasy, but I found myself moving on to create my own little finishes to them...no hood just a collar, and vests! Very versatile and fun to play with. Basically the netting pattern, so a great project for the evening "unwind/relax" time. 


 Back of sweater


 I added a row of sc trim at the edge of the sleeves in Deborah Norville's Serentity Garden Yarn (in Hydrangea) to add a little pop of color.