Showing posts with label Pattern. Show all posts

Tuesday, December 17, 2013

Bits & Bobs into a girls bag!

Awhile back I found this pattern for a cute hooked Hearts Afghan and pulled out my red yarn, creating one of the squares.  I knew that I didn't want to create a full-sized blanket out of the pattern, so I tucked the square aside until the "right project" popped into my mind.  So yesterday I pulled out all my bits & bobs of yarn colors and tackled that "right project"! 
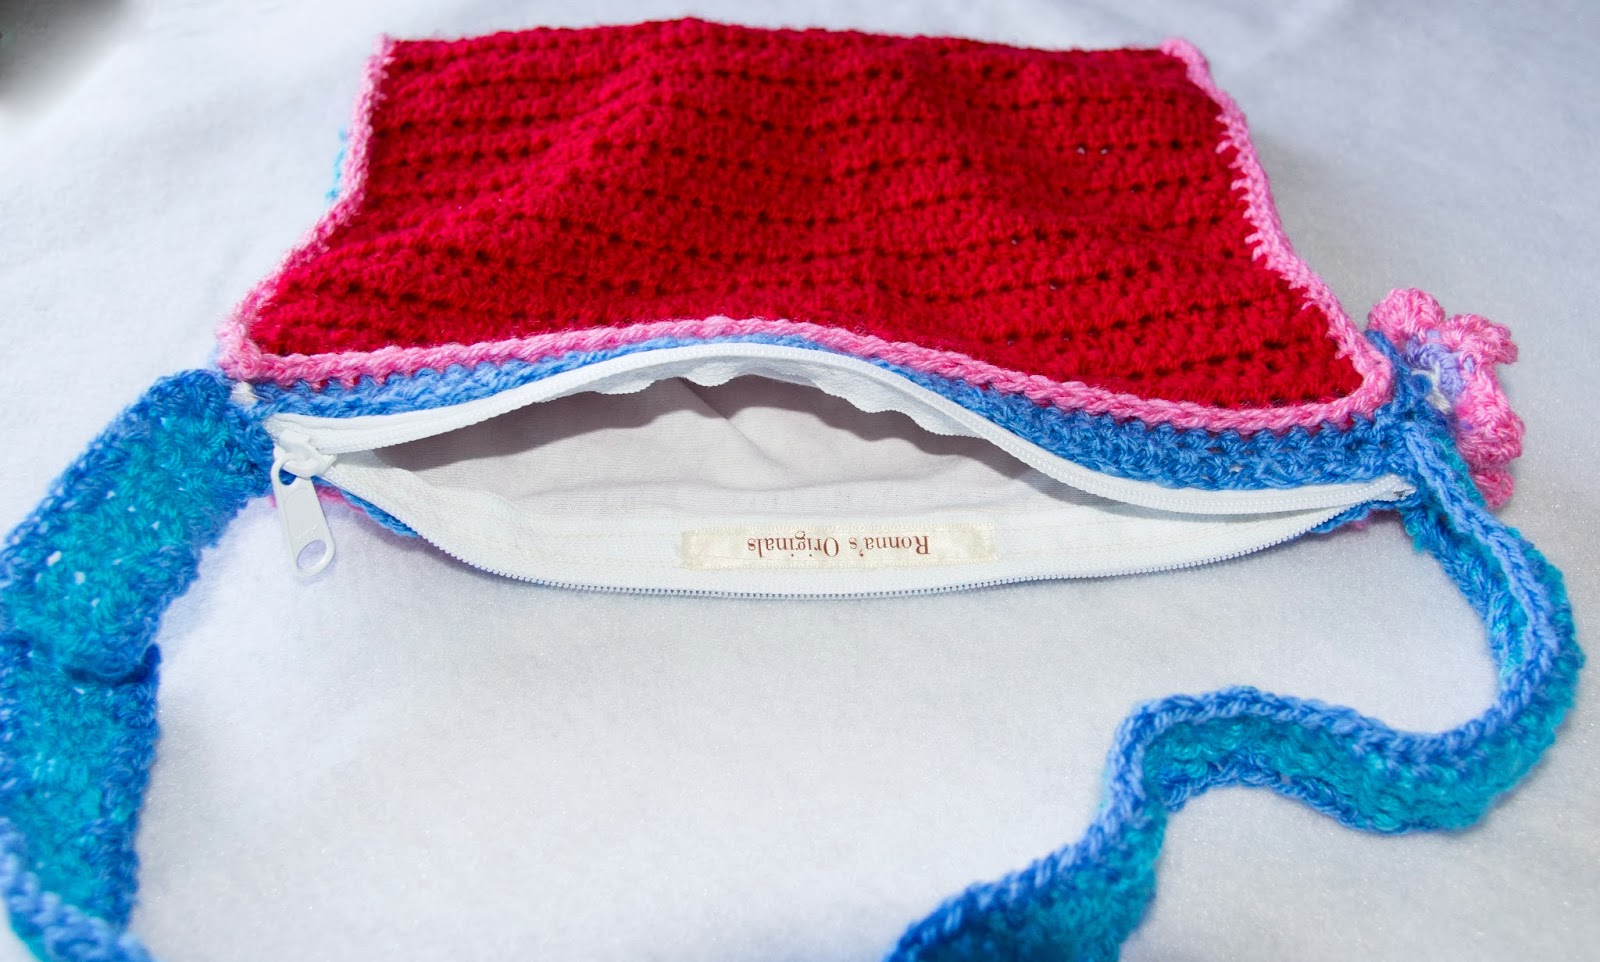
 I made a fully-lined with a zipper and everything bag for our youngest niece!


 The ubber cuteness almost got to me ;)  
but I love how cheery and bright it turned out!


My Girls Hooked Bag Tutorial O' Sorts:
I took my red heart square, sl st my red yarn into the bottom corner (red puffy heart/right side up!) hook 1 row sc, 4 rows dc, 1 row sc. (This is the base rows of the bottom of the bag).  Next continue on hooking the back of the bag with 30 rows of hdc's.  (When near the end I count to make sure the front and back are even!)


There you have it, a front/base/back of the bag.  
I started this in the evening thus the darker photos, but you can get the idea! 


Next I picked out a cornflower blue shade to create the bag strap. 
I created it 4 dc's wide and 24 inches long.


Now to attach the strap to the bag.  
I knew that I wanted the bubblegum pink as a trim 
so I used this as my yarn to piece it together.   
SLST into the bottom corner of the base, then sc around
 (4 sc's for the base bottom, adding an extra 2 sc's in each of the corners, and continuing up the side of the bag front.)  
Once you are at the top corner, 
continue with sc's across the top of the bag.


Continue down the other side, attaching the strap 
and making sure you don't have the handle twisted!  
I pinned it to the base bottom of the opposite side
 so I knew exactly where it would meet at the top right of the bag.
Keep attaching the handle to the bag with sc's around, 
up the other side of the handle and back of bag.  
SLST to beginning sc. 


 Next I created a zipper placket for the top of the bag.  
SLST your color onto the top corner, sc in same sp.  
Then hdc around in each stitch, with 4 hdc's in each end.  
It ends up looking like a long rectangle box.  
Now do any trims or designs to your bag that you would like.  Doing it now keeps all the ends inside the bag 
and not a hassle later after your lining is inside!  
I took white yarn and created cross-stitch pattern around the heart. 
And a row of slst border around the heart in lavender. I also took a sky blue and trimmed the handle with sc's.


This is what it looks like when finished:


Now you have a nice placket to attach your zipper to, 
making it all pretty and hidden! 


 Next take out your lining material.  
I used basic white cotton and a large white zipper.


 Make this as you would any bag or bag lining.  
(There are lots of tutorials out there if you need help! Some day I promise I will get to making a tut on a basic bags!)

 So just remember, you want the inside of this bag lining to be "pretty seams" and the outside is okay showing  seam ends as it will be inside the hooked bag.
 I squared off the bottoms of the lining, and added my label to the inside of the zipper lining.


Next slide your lining inside of the hooked bag and pin in place.  Hand sew it to the top of the blue rows of hdc's all the way around, giving it some extra attention at each end.  Make sure you keep your hdc's below the zipper line so it won't get stuck inside the zipper when using!


 Next add on any trims you would like.  
I made a basic flower and added a hooked heart to it's center.


 And all done!  I love how cutsie and girly it turned out!


Friday, December 13, 2013

Eye Masks!

I love all the spa and bath gift sets that come out at Christmas time...
but if you are like me, some of them just do not have "just enough" in them for a great gift.
I like to add a few little things to mine to give them a little extra handmade touch.
Sometimes a few scrubby hooked washcloths or bathmitts, or a pair of hooked slippers.
This year I decided to use some of my hooked bits of Irish Crochet and create some eye masks.
Easier to make than I first thought too!
Awhile back I made some superhero eye masks and I kept thinking to use the same method and create some spa-style masks for the ladies in my life.  Finally I did!
I love how they turned out!  And mmm...I filled them with lavender grown, harvested, and dried by myself!  A full circle gift :)


Eye masks are really simple! (There are a ton of tut's out there for those who need photos to follow-along or a more in-depth tut!) I do have some red silk and black hooked lace that I'll be creating next so I'll be sure to do photos for some help!

Here is what I did:
Draw your template on a piece of paper or cardboard.  Cut out your front/back and batting pieces from it.  I take my batting then and sew around the 3 sides, leaving one open to insert the lavender, then sew up the forth side.  On the front piece of fabric, I pinned my hooked lace and then basted it on, making sure that the front side of the fabric was facing upwards. Next I cut a piece of fabric for my elastic "sleeve", making sure it was long enough for a head-size, and basted it to the front piece on each side.  Next I laid the back piece on top of the front piece, right sides together, pin it and sew around the sides and bottom while being careful for the elastic inside. Leave the top open about 4 inches for turning.  Turn it right side out, press the back (being careful with the lace), push the corners out, and then slide the batting inside.  Sew up the top opening and done!  Easy and yet a beautiful gift! 

Wednesday, May 15, 2013

My Mother's Day gift for my Momma


I found this pattern called 'Floral Medallions Tablecloth' in a book (I will search for the book title and post the details!) that was made up of rows of this flower medallion pattern, repeated across for a tablecloth.  I knew that I loved the floral piece in this mesh pattern, yet knew that I would get bored repeating it constantly for a tablecloth-size piece. 
So I decided to create it into a table runner for my Momma for Mother's Day, and that the cream mesh would be beautiful on their warm-wood dining table.
Off to creation I went!


Details:
1 row of the floral medallion pattern (using Rows 1-18 of the pattern). 
Then I created a middle section as I went:
Rows 19-21 I did rows of alternating open/closed mesh across the rows. (Checkerboard pattern) 
Rows 22-23 open mesh
Rows 24-30 I created an arrow pointing inwards from both sides (in towards the middle) with a 6 space open mesh between. 
Rows 31-32 open mesh
Rows 33-35 alternating open/closed mesh across the rows (checkerboard pattern)
Then I repeated the floral medallion pattern again.
For the edging I just did a basic sc around, with 3 sc in each corner for turning. 

Wednesday, March 20, 2013

My Hooked & Woven Baby Blanket Pattern

I have been seeing some amazing woven crocheted/hooked blankets out there, and they really are a "new take" on hooking for me.  They really do resemble the Scottish Plaid Afghans.
So I decided (after following one pattern and having to expand the size of it for my liking) to create my own pattern in the size and striped pattern that I wanted.  
The yarn I love using is Deramores Stylecraft. I picked the colors Aster, Aqua, Lipstick, and Saffron for this blanket.  They really stand out together and are awesomely bright for a baby boy blanket in which I was creating! 

  Front of Blanket
 Back of Blanket

For those of you who need more instruction than my basic steps,
please search "how to crochet" online via basic search or thru youtube.com!

My Hooked & Woven Baby Blanket Pattern:
Step 1:
Using Hook US G6/4.00MM ch 143
Row1: dc in fifth ch from hook (this is your first dc and ch1) *ch 1, skip 1 ch, dc in next ch.  Repeat from * across to end with dc. Ch 4 (counts as dc & ch1) and turn for next row.

Row2: *dc in dc, ch 1. Repeat across, ending with dc. Ch 4 and turn.  
Repeat this pattern creating your "mesh" background using Row 2 until you have a total of    67 rows.  
This gives you a "mesh" background of 70 "squares" wide & 67 "squares" tall.
(Mine is approx. 28" square.) 
Be sure to weave in the ends of your yarn at each start of a new color, as this saves you time later! Unless you plan on adding an edging to your blanket that will work them all in. 
  
Color Pattern for "mesh" background:  8 rows Aqua, *2 rows Saffron, 1 row Lipstick, 1 row Aster, 1 row Lipstick, 2 rows saffron, 4 rows aqua, 2 rows Saffron, 1 row Aster, 1 row Lipstick, 1 row Aster, 2 rows Saffron, 4 rows Aqua, repeat from * ending with 8 rows Aqua

Step 2:
Using Hook US H8/5.00MM Start your rows of weaving.  To do this you are simply doing a row up sl st's up the mesh background.   (color pattern at end of photos)
The first patterns that I found do this process, using vintage crochet sites, were just printed out words and I was at a loss!  So here are some photos to help you along!

You make your slip knot & insert hook into first "square" of the mesh.
Draw up a loop, and keep working into the next "square".
SL ST each time and working your way upwards from the bottom first row of the blanket.


Be sure to hold your yarn behind your blanket, or you will have a tangled mess!  
This is what takes some getting used to, but once you get the hang of it, it's a very fast process! Also keep it loose, you will want this to be worked loosely, or you will end up with a tiny tight blanket.   (I loose about 4" in the height during the "weaving" step, so keep it loose!)

The stripes pattern for Step 2: Starting from the far bottom left corner of the blanket, work from left to right.
*4  rows Aqua, 2 rows Saffron, 1 row Aster, 1 row Lipstick, 1 row Aster, 2 rows Saffron, 4 rows Aqua, 2 rows Saffron, 1 row Lipstick, 1 row Aster, 1 row Lipstick, 2 rows Saffron, 
*Repeat to edge at right-side ending with 4 rows Aqua. 


For those of you who notice the pattern/or are overly OCD about things...you can adjust this so the pattern is centered. I.E.  the red/aster stripes start and finish with offsets.

Next go thru and knot each start/end of the stripes rows.  You can weave them in & trim, or leave them hanging as I did.  I did, as I mentioned, gave each one a good double-knot and then trimmed them all neatly the same length.  This gives it a nice fringe, just like the Scottish Plaid blankets that this is patterned after. Or you can add your own edging pattern, simple or extreme...up to you!

Finished!
Approx. 28" wide & 24" tall
 
I hope that this is easy for you to understand and helps you create a quick & very pretty patterned woven blanket!  Please feel free to share your creations, sell your creations, etc.using my pattern.
Just please do not sell my pattern. Please link back to here for my pattern.


Monday, January 7, 2013

Monday Monday...

A day of peaceful hooking.  
A hot cup of chai, hook & yarn, and my slippies!


I originally picked up 3 balls of the Bernat Baby Blanket (100% Poly, but it feels so super soft like Terry Cloth!) to create a baby blanket gift.  After rolling the first ball, I fell in love with how SOFT it felt in my hands.  I knew then that I had to make myself a scarf out of it!  

No fancy pattern, the bulk of it is enough.  In fact, as it came together, it has reminded me of the loom potholders I used to make as a kid...or the loop rag rugs!  Anyway, so soft and ready for my next walk in the brisk January air! 


What I did: Using 1 ball Bernat Baby Blanket (10.5 oz) and using a N hook (9MM)
 Chain 14, then sc in 2nd chain from hook (gives one turning ch) and repeat across to end, ch 1 & turn. Repeat back and forth until desired length.  I used up the ball on this one, wanting it long enough to wrap around me twice...so I can pull it up over my mouth in the wind!

Happy Hooking!

Wednesday, June 6, 2012

Yay for Bright Bright Colors and Soft Yarn!


Yay for Bright Bright Colors and Soft Yarn! 


I created these Girls Sized Legwarmers for a gift, so hopefully I will have a photo soon to share of them on some cute legs!

As always, feel free to use my pattern. You may not resell or distribute though! 
For those of you who  have asked if you can create & sell via your Etsy Shops items from my
patterns: Yes! But please have the respect for the time I spent creating & posting this to share with you BY adding this Blog Post to your Item Description (stating that the pattern is by me).  
Thank you!  

Happy Hooking!


Here is the pattern I created:
 
Top Ribbing: Hook G. Light Pink. Basic top ribbing pattern. I did 13 sc tall, SC BLO back & forth until it was 36 sc's around.  SL ST together.  SC around (36 SC's) twice. (Many tutorials online to help you with this!)

Main Body: Hook H. Continue working down the body of the legwarmer, joining to beginning stitch at the end of each round.  Start each round with CH1 if it makes your yarn/rounds more plyable/finished.  Sometimes I just continue to the next round, it's up to what makes yours feel/work right.  For my Popcorns I use 4 HDC's.
  1. Switch to Blue.  SC around (36 SC's)
  2. CH 2 (counts as 1st HDC), HDC around (36 HDC's)
  3. SC around (36 SC's)
  4. Switch to Red. SC around (36 SC's)
  5. Switch to Bright Pink. SC around (36 SC's)
  6. CH 2 (Counts as 1st HDC), * Popcorn, 2 HDC's; repeat from * around ending with 1 HDC
  7. SC around (36 SC's)
  8. Switch to Red.SC around (36 SC's)
  9. Switch to Blue. SC around (36 SC's)
  10. Repeat round 2
  11. SC around (36 SC's)
  12.  Switch to Light Pink. SC around (36 SC's)
  13. SC around (36 SC's)
  14. SC around (36 SC's)
  15. Switch to Turquoise.  SC around (36 SC's)
  16. Start basic zig-zag stripe pattern for ruffle.  (Rows 1, 2, and 3) tie off.
  17. Underneath/backside, Attach Light Pink to top row of Turquoise.  SC around (36 SC's)
  18. Continue SC around. (36 SC's)
  19. Repeat 18
  20. Repeat 18
  21. Repeat 18
  22. Repeat 18
  23. Repeat 18
  24. Repeat 18
  25. Switch to Red. SC around (36 SC's)
  26. Switch to Bright Pink. SC around (36 SC's)
  27. Switch to Light Pink. SC around (36 SC's)
  28. Switch to Red. SC around (36 SC's)
  29.  Switch to Bright Pink. SC around (36 SC's)
  30.  Switch to Light Pink. SC around (36 SC's)
  31.  Switch to Red. SC around (36 SC's)
  32.   Switch to Bright Pink. SC around (36 SC's)
  33. CH 2 (counts as 1st HDC), * Popcorn, 2 HDC; repeat around from * ending with 1 HDC
  34.  SC around (36 SC's)
  35.  Switch to Light Pink. SC around (36 SC's)
  36.  CH 2 (counts as 1st HDC), * 1 HDC, Popcorn; repeat around from * ending with Popcorn.
  37. SC around (36 SC's)
  38. Switch to Bright Pink. SC around (36 SC's)
  39.  CH 2 (counts as 1st HDC), * Popcorn, 2 HDC; repeat around from * ending with 1 HDC
  40. SC around (36 SC's)
  41.  Switch to Red. SC around (36 SC's)
  42.  Switch to Light Pink. SC around (36 SC's)
  43.  Switch to Bright Pink. SC around (36 SC's)
  44.  Switch to Red. SC around (36 SC's)
  45.  Switch to Light Pink. SC around (36 SC's)
  46.  Switch to Bright Pink. SC around (36 SC's)
  47.  Switch to Red. SC around (36 SC's)
  48.  Switch to Light Pink. SC around (36 SC's)
  49. SC around (36 SC's)
  50.  SC around (36 SC's)  
Switch back to Hook G.  SC around (36 SC's) twice.  Continue on to bottom ribbing, using basic SC into BLO technique.  Tie off and weave/trim the ends of loose yarns on the inside.

For the tie at top, SC length you want, tie off ends/knot.  Weave thru bottom of the top ribbing.


 The ZigZag Stripes Pattern ended after the basic Rows 1(in Turquoise) 
Rows 2 & 3 (in Bright Pink).  It gives a nice ruffle to the legwarmer.