Showing posts with label project. Show all posts

Tuesday, December 17, 2013

Bits & Bobs into a girls bag!

Awhile back I found this pattern for a cute hooked Hearts Afghan and pulled out my red yarn, creating one of the squares.  I knew that I didn't want to create a full-sized blanket out of the pattern, so I tucked the square aside until the "right project" popped into my mind.  So yesterday I pulled out all my bits & bobs of yarn colors and tackled that "right project"! 
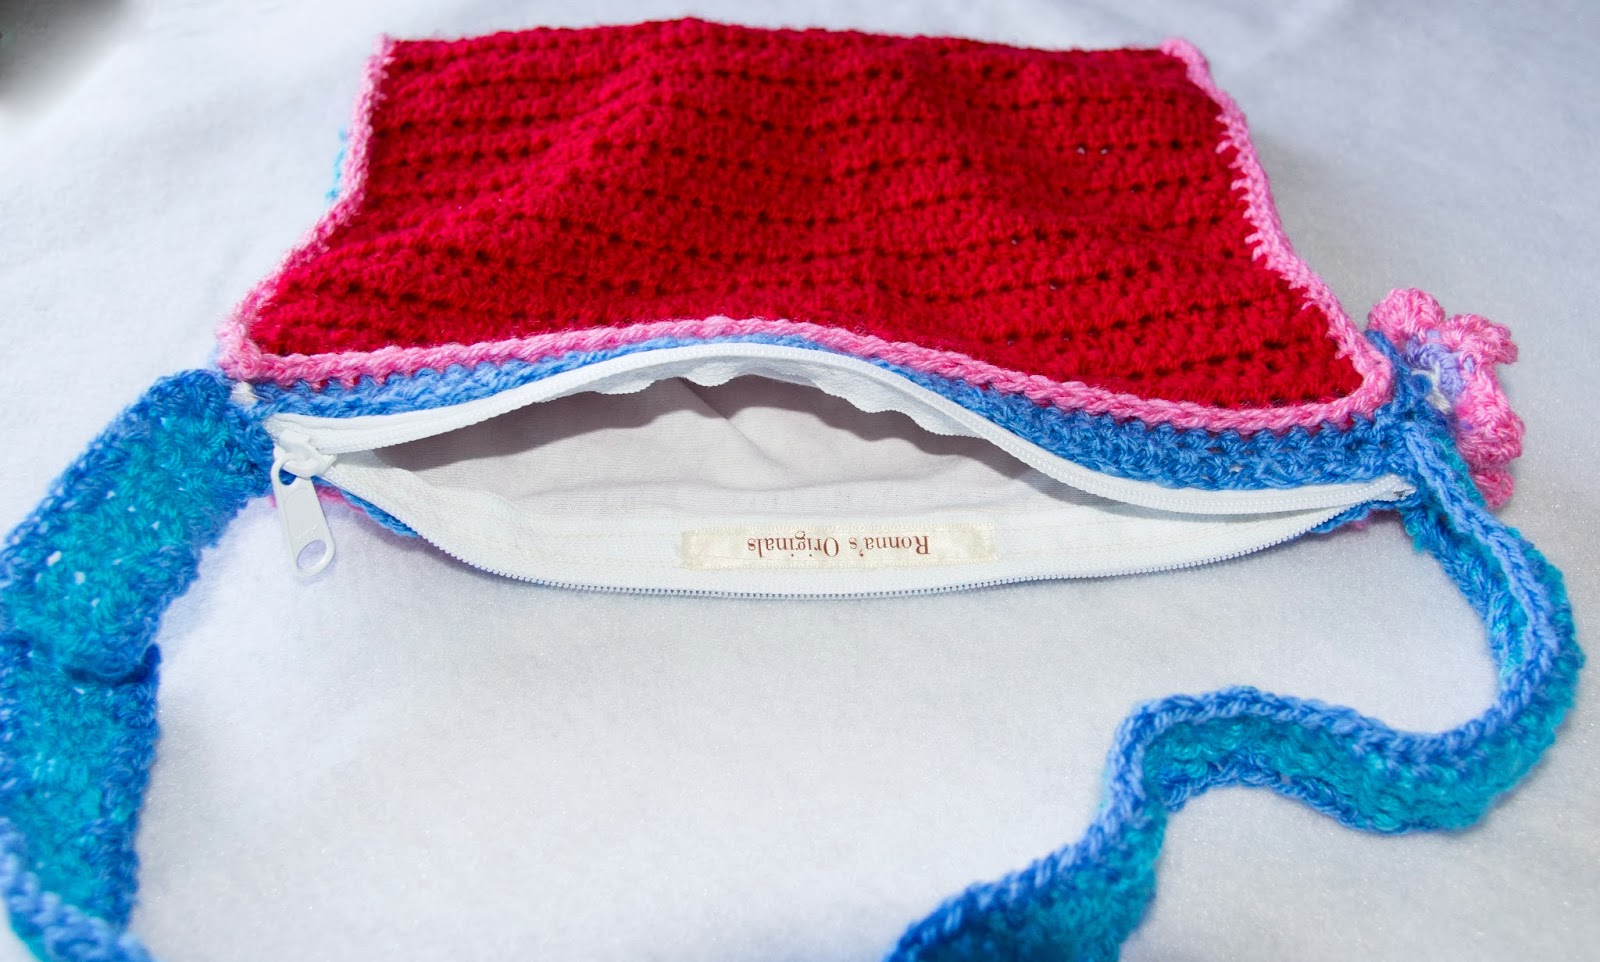
 I made a fully-lined with a zipper and everything bag for our youngest niece!


 The ubber cuteness almost got to me ;)  
but I love how cheery and bright it turned out!


My Girls Hooked Bag Tutorial O' Sorts:
I took my red heart square, sl st my red yarn into the bottom corner (red puffy heart/right side up!) hook 1 row sc, 4 rows dc, 1 row sc. (This is the base rows of the bottom of the bag).  Next continue on hooking the back of the bag with 30 rows of hdc's.  (When near the end I count to make sure the front and back are even!)


There you have it, a front/base/back of the bag.  
I started this in the evening thus the darker photos, but you can get the idea! 


Next I picked out a cornflower blue shade to create the bag strap. 
I created it 4 dc's wide and 24 inches long.


Now to attach the strap to the bag.  
I knew that I wanted the bubblegum pink as a trim 
so I used this as my yarn to piece it together.   
SLST into the bottom corner of the base, then sc around
 (4 sc's for the base bottom, adding an extra 2 sc's in each of the corners, and continuing up the side of the bag front.)  
Once you are at the top corner, 
continue with sc's across the top of the bag.


Continue down the other side, attaching the strap 
and making sure you don't have the handle twisted!  
I pinned it to the base bottom of the opposite side
 so I knew exactly where it would meet at the top right of the bag.
Keep attaching the handle to the bag with sc's around, 
up the other side of the handle and back of bag.  
SLST to beginning sc. 


 Next I created a zipper placket for the top of the bag.  
SLST your color onto the top corner, sc in same sp.  
Then hdc around in each stitch, with 4 hdc's in each end.  
It ends up looking like a long rectangle box.  
Now do any trims or designs to your bag that you would like.  Doing it now keeps all the ends inside the bag 
and not a hassle later after your lining is inside!  
I took white yarn and created cross-stitch pattern around the heart. 
And a row of slst border around the heart in lavender. I also took a sky blue and trimmed the handle with sc's.


This is what it looks like when finished:


Now you have a nice placket to attach your zipper to, 
making it all pretty and hidden! 


 Next take out your lining material.  
I used basic white cotton and a large white zipper.


 Make this as you would any bag or bag lining.  
(There are lots of tutorials out there if you need help! Some day I promise I will get to making a tut on a basic bags!)

 So just remember, you want the inside of this bag lining to be "pretty seams" and the outside is okay showing  seam ends as it will be inside the hooked bag.
 I squared off the bottoms of the lining, and added my label to the inside of the zipper lining.


Next slide your lining inside of the hooked bag and pin in place.  Hand sew it to the top of the blue rows of hdc's all the way around, giving it some extra attention at each end.  Make sure you keep your hdc's below the zipper line so it won't get stuck inside the zipper when using!


 Next add on any trims you would like.  
I made a basic flower and added a hooked heart to it's center.


 And all done!  I love how cutsie and girly it turned out!


Monday, December 16, 2013

Christmas Snowflakes


The end of Fall here in Seattle has given way 
to many days just like this...


Snowflakes...and more snowflakes...and even more snowflakes!


Earrings, buttons, pins, ornaments, and gift tags!


These make quick & easy gifts, yet they are so cute & unique! 
A love for anyone who loves handmade things.  I love to add a snowflake pin onto my scarf, or to the front of my hat...it adds a bit more of Christmastime to my winter garb!

There are so so so many crochet patterns out there for snowflakes.  I found these on Red Heart yarns   free patterns.  
To create into earrings just add your earring hook onto one of your last rows of points. Or sew on your pin hardware to the back of a snowflake.  I then pin them out and starch them overnight. 


Friday, December 13, 2013

Eye Masks!

I love all the spa and bath gift sets that come out at Christmas time...
but if you are like me, some of them just do not have "just enough" in them for a great gift.
I like to add a few little things to mine to give them a little extra handmade touch.
Sometimes a few scrubby hooked washcloths or bathmitts, or a pair of hooked slippers.
This year I decided to use some of my hooked bits of Irish Crochet and create some eye masks.
Easier to make than I first thought too!
Awhile back I made some superhero eye masks and I kept thinking to use the same method and create some spa-style masks for the ladies in my life.  Finally I did!
I love how they turned out!  And mmm...I filled them with lavender grown, harvested, and dried by myself!  A full circle gift :)


Eye masks are really simple! (There are a ton of tut's out there for those who need photos to follow-along or a more in-depth tut!) I do have some red silk and black hooked lace that I'll be creating next so I'll be sure to do photos for some help!

Here is what I did:
Draw your template on a piece of paper or cardboard.  Cut out your front/back and batting pieces from it.  I take my batting then and sew around the 3 sides, leaving one open to insert the lavender, then sew up the forth side.  On the front piece of fabric, I pinned my hooked lace and then basted it on, making sure that the front side of the fabric was facing upwards. Next I cut a piece of fabric for my elastic "sleeve", making sure it was long enough for a head-size, and basted it to the front piece on each side.  Next I laid the back piece on top of the front piece, right sides together, pin it and sew around the sides and bottom while being careful for the elastic inside. Leave the top open about 4 inches for turning.  Turn it right side out, press the back (being careful with the lace), push the corners out, and then slide the batting inside.  Sew up the top opening and done!  Easy and yet a beautiful gift! 

Tuesday, November 12, 2013

2 UFO's Tackled makes for an AWESOME Tuesday!


Today I actually tackled not one UFO...
but TWO! 
Extreme excitement here, as they are also to be Christmas gifts! 
(Fellow crafters will understand the excitement about finishing UFO's!)


 I was very excited to find the pattern for the Bohemian Stevie Nick's Vest (from www.theedgeof17.com) that I found  while looking thru www.ravelry.com
The pattern starts off centered around the back, working in armholes and then the edging.  The pattern seems to be a write-up of the older pattern that I found at the very bottom of the pattern.  For those of you like me that just like a chart to follow, not each row written out, then skip to the bottom!


                                                                      Front


I knew that the Deborah Norville's Serentity Garden Yarn (in Hydrangea) would be perfect with my tucked away Paton's Silk Bamboo (in coal).  The Hyndrangea blend is amaing! AMAZING! The perfect blend of my favorite colors! I had to order this yarn, as I can never find it in any local stores!


                                                 Back

I didn't like how it focused so much on the center motif circle that the pattern originates from, so I decided to add two belt loops and a basic sash tie belt. 


                                     Detail of the edging

I decided early on that it was just going to be wayyy too long.  It definitely is for taller people! 
So I skipped a few rows, adding hdc's instead of dc's etc.  The edging I even cut short.  I will definitely be playing around with this pattern again, lots of ways to change it up!


 UFO Take Two
Awhile ago I came across this blanket done in cheery colors, making rows of pretty hearts across the blanket.  So when I was going thru my yarn basket at the time, I picked out the soft baby pink & cream wool.  I wasn't sure if I liked how it was turning out, the thick wool and only two-tones just wasn't "doing it" with using that pattern.  So I tucked it away...until today!


Yay! 
I do have to say that I'm happy that I just tucked it away 
and that I didn't tear it back and start over with something else!

Thursday, July 25, 2013

Baby Blanket Finished!

I started this baby blanket in bamboo crochet thread using size 7 hook quite awhile ago.
It was tiny stitches and definitely took me many evenings hooking to finish it!
So I feel very happy that this project is finished, and turned out so beautiful!


 What pattern did I use?

For most of the blankets that I create, I use basic stitch patterns that can be found on www.mypicot.com
or in one of my favorite crochet books.  

This stitch pattern for the baby blanket was found in this book, one of my favorites!  

 
It's called 'Fan Lattice' located on page 101


*Changes I made. Instead of the tr stitches, I did a dc. It fit better with the thinner bamboo thread.

 For the edging I just did a basic sc row around, weaving in the loose ends.


Hooked Bodice Top


 I love how so many summer tops are having hooked pieces to them!
So when I stumbled upon a Japanese crochet pattern for this hooked bodice top with a fabric skirt attached, I knew that I had to make it!


 It starts very easy, you create the squares that form the ring around the mid-riff area, attaching each one to each other as you go.

I used size 10 crochet thread in off white/ecru and a size B hook.  This was hard for me, as I typically use a size 6 or 7 hook with the crochet thread.  The pattern called for a size B to create the right gauge, so I kept with that for this first attempt.  Perhaps now that I finished one, I will try one using the smaller hook and adjust the pattern to fit the smaller pieces. 


 Next you add a row of mesh to the top of the ring formed by the attached squares.
From here you continue upwards to create the top of the bodice.


Ending with basic dc straps and a sc edging.
The bottom is a basic mesh row, then dc rows, with an added basic edging.
Topped off with a crochet tie/bow and some hidden snaps.


 I attached a skirt of pink rosebud print and here it is!
I love how it turned out!


Now to send it off to our oldest niece and *fingers crossed* it fits her and that she likes it! 


Tuesday, July 16, 2013

Another patchwork skirt!


Another patchwork skirt done!  
Our niece Allie went thru my fabric drawers last month 
and after "ohhhhing and ahhhhing" on several fabrics, 
she informed me that she wanted a "twirlly one with owls...
and birds...and girls...and...and...and...and".  
I think that I covered all the "ands" and then some!


These are so much fun to make and a great way to use up the 
bits & pieces held onto for something special! 
I love adding all the little trinkets that I've held on to also...
the special buttons, the hooked flowers & trims that I have made,
and the patches that I made out of favorite fabrics.  

Super easy to do.  Measure the waist and cut your fabric like you would for any draw-string waist band skirt.  There are SO many youtube videos to help you thru this if you haven't made them before and need some help to follow along.  I just make 2 buttonholes on my machine for the drawstring waistband (cutting a piece of elastic 1/3 the dimension of the waist measurement and sewing on two ties to the ends, weaving out the buttonholes).
Each row after the 'base waistband row' I add a bit more material and gather...before you know it, you are done! 


Tuesday, June 18, 2013

Doily...Skirts and Skirts

I wasn't sure if I had shared this here or not...so if it's a double it's a double ha!
I found a Japanese vest pattern that I thought was sooo pretty and after taking a longer look at it, the center of it starts with this beautiful pineapple doily piece.  So I created it just as a doily and love it!  Wedding season is starting and  many gifts to find...one down!


And Skirts!  My nieces ask for SKIRTS!  So here are a few of the latest I made.
I love this wildflower cotton print I found, reminds me so much of The Little House on the Prairie! 

Wednesday, May 15, 2013

A recap of projects...


A cousin of mine is preparing for a new little one...so to my hook I go! 
I picked up some really soft bamboo crochet thread 
to start a baby blanket out of the basic granny square pattern!


 We don't have red meat often, so this night was a real treat!
I made asparagus roll-ups with red potatoes sprinkled with garlic, fresh parm, & parsley.
Very yummy!

Details:
I dunked the fresh asparagus in boiling water for 4 minutes. Let it cool.
In a saute pan-browned fresh garlic, red onion, and some herbs de Provence.
I then laid out the flank steak/skirt steak and spread the garlic onion mixture on it, topped with a slice of smoked gouda from our local cheese market, and added the asparagus.  Gently rolled up and placed on my grilling pan and seared the sides.  
Tucked in the oven to finish off by baking with the potatoes.
Easy...yet looks like you spent forever in the kitchen creating a gourmet meal! 


 Rainbow zippered bags for a group of lovely ladies to celebrate LGBT Pride Month this June!

My Mother's Day gift for my Momma


I found this pattern called 'Floral Medallions Tablecloth' in a book (I will search for the book title and post the details!) that was made up of rows of this flower medallion pattern, repeated across for a tablecloth.  I knew that I loved the floral piece in this mesh pattern, yet knew that I would get bored repeating it constantly for a tablecloth-size piece. 
So I decided to create it into a table runner for my Momma for Mother's Day, and that the cream mesh would be beautiful on their warm-wood dining table.
Off to creation I went!


Details:
1 row of the floral medallion pattern (using Rows 1-18 of the pattern). 
Then I created a middle section as I went:
Rows 19-21 I did rows of alternating open/closed mesh across the rows. (Checkerboard pattern) 
Rows 22-23 open mesh
Rows 24-30 I created an arrow pointing inwards from both sides (in towards the middle) with a 6 space open mesh between. 
Rows 31-32 open mesh
Rows 33-35 alternating open/closed mesh across the rows (checkerboard pattern)
Then I repeated the floral medallion pattern again.
For the edging I just did a basic sc around, with 3 sc in each corner for turning. 

Monday, April 8, 2013

New Recipe and New Project!


I had originally thought to make a small pot of Guinness Stew, 
but then thought something pasta'ish...
something beefy and mushroomy for dinner. 
We came up with this!


Ronna's Guinness Beefy Mushroom Pasta: 
(I don't measure exactly, so just adjust to the amount you are cooking, this is for two of us)

Cut up and marinate a steak in about 1 cup of Guinness Beer for 15-30 min... reserving about 1/4 cup for later and giving your husband the remaining of the can o' frothiness. 
While this is marinating- I cook 1 cup pasta & drain it. 
Also while the pasta is cooking- I saute diced mushrooms, garlic, and red onion to later add to my Béchamel sauce. Remove from pan when finished and place to the side
.
Drain off  the marinade and saute the beef with diced onions and garlic until the beef is cooked. 
Add in 1 cup sliced mushrooms and the reserved 1/4 cup of Guinness.  I simmered this until the beer was gone and left was some very yummy smelling beefy mushrooms. 
Next add 1 cup sliced asparagus and saute just until tender (or further if you like yours cooked more, we like ours with some crunch still and no mush).
Turn down the heat, just to keep it warm while you create your mushroom sauce.

I just make a basic Béchamel/white sauce in a small pan.  Once it is ready, I add the mushroom/garlic/onions I had precooked and set aside.  Stir together and once this is hot I add in the  noodles, mixing it all up.

Prepare your plates with a pile of fresh spinach (or if you like yours mixed together, stir the spinach leaves in with your pasta in the sauce).
Top with the pasta, then the beefy mushroom asparagus goodness.
Top with some fresh Parmesan and parsley.

Super Yummy! 


New Project Time!
I'm going to create a granny bag out of this yarn and bamboo purse handles.
They seem to be very popular right now and I love how they look! 
I of course picked up some yarn before I knew I would need more than 2 skeins of, 
so I'm going to mix in some black wool with it. 
Whew...quick fix!

Wednesday, March 20, 2013

My Hooked & Woven Baby Blanket Pattern

I have been seeing some amazing woven crocheted/hooked blankets out there, and they really are a "new take" on hooking for me.  They really do resemble the Scottish Plaid Afghans.
So I decided (after following one pattern and having to expand the size of it for my liking) to create my own pattern in the size and striped pattern that I wanted.  
The yarn I love using is Deramores Stylecraft. I picked the colors Aster, Aqua, Lipstick, and Saffron for this blanket.  They really stand out together and are awesomely bright for a baby boy blanket in which I was creating! 

  Front of Blanket
 Back of Blanket

For those of you who need more instruction than my basic steps,
please search "how to crochet" online via basic search or thru youtube.com!

My Hooked & Woven Baby Blanket Pattern:
Step 1:
Using Hook US G6/4.00MM ch 143
Row1: dc in fifth ch from hook (this is your first dc and ch1) *ch 1, skip 1 ch, dc in next ch.  Repeat from * across to end with dc. Ch 4 (counts as dc & ch1) and turn for next row.

Row2: *dc in dc, ch 1. Repeat across, ending with dc. Ch 4 and turn.  
Repeat this pattern creating your "mesh" background using Row 2 until you have a total of    67 rows.  
This gives you a "mesh" background of 70 "squares" wide & 67 "squares" tall.
(Mine is approx. 28" square.) 
Be sure to weave in the ends of your yarn at each start of a new color, as this saves you time later! Unless you plan on adding an edging to your blanket that will work them all in. 
  
Color Pattern for "mesh" background:  8 rows Aqua, *2 rows Saffron, 1 row Lipstick, 1 row Aster, 1 row Lipstick, 2 rows saffron, 4 rows aqua, 2 rows Saffron, 1 row Aster, 1 row Lipstick, 1 row Aster, 2 rows Saffron, 4 rows Aqua, repeat from * ending with 8 rows Aqua

Step 2:
Using Hook US H8/5.00MM Start your rows of weaving.  To do this you are simply doing a row up sl st's up the mesh background.   (color pattern at end of photos)
The first patterns that I found do this process, using vintage crochet sites, were just printed out words and I was at a loss!  So here are some photos to help you along!

You make your slip knot & insert hook into first "square" of the mesh.
Draw up a loop, and keep working into the next "square".
SL ST each time and working your way upwards from the bottom first row of the blanket.


Be sure to hold your yarn behind your blanket, or you will have a tangled mess!  
This is what takes some getting used to, but once you get the hang of it, it's a very fast process! Also keep it loose, you will want this to be worked loosely, or you will end up with a tiny tight blanket.   (I loose about 4" in the height during the "weaving" step, so keep it loose!)

The stripes pattern for Step 2: Starting from the far bottom left corner of the blanket, work from left to right.
*4  rows Aqua, 2 rows Saffron, 1 row Aster, 1 row Lipstick, 1 row Aster, 2 rows Saffron, 4 rows Aqua, 2 rows Saffron, 1 row Lipstick, 1 row Aster, 1 row Lipstick, 2 rows Saffron, 
*Repeat to edge at right-side ending with 4 rows Aqua. 


For those of you who notice the pattern/or are overly OCD about things...you can adjust this so the pattern is centered. I.E.  the red/aster stripes start and finish with offsets.

Next go thru and knot each start/end of the stripes rows.  You can weave them in & trim, or leave them hanging as I did.  I did, as I mentioned, gave each one a good double-knot and then trimmed them all neatly the same length.  This gives it a nice fringe, just like the Scottish Plaid blankets that this is patterned after. Or you can add your own edging pattern, simple or extreme...up to you!

Finished!
Approx. 28" wide & 24" tall
 
I hope that this is easy for you to understand and helps you create a quick & very pretty patterned woven blanket!  Please feel free to share your creations, sell your creations, etc.using my pattern.
Just please do not sell my pattern. Please link back to here for my pattern.