Wednesday, September 19, 2012

Drawstring Bags & Tutorial

I've been creating and using "fabric gift bags" for quite awhile now.  
They are a great way to showcase some of your favorite fabrics, or use up that stash!  
A simple draw-string closure or two handles for a little girls bag...so many options when creating!  

Gift wrapping is nice, but in all reality most people just throw it away. 
Hardly anyone reuses it, so these fabric bags make that happen.  They are great to re-use for just about anything.  Extra toys to keep in the car (especially for in the Grandparents car!), tuck in play clothes, shoe keeper for the backpack or suitcase...or even to reuse as a gift bag! 


Their age or an initial looks great for the kids birthday bags!

Or add some handles 
and a birthday party treat bag 
can be reused afterwards for a book tote!


I also made up a couple to hold the superhero masks that I made.


They can be simple with the drawstring across the top (no placket), but I like the looks of adding the extra bit of a coordinating fabric to encase the draw-string.  And the string...oh strings! Here you can be basic with a simple piece of yarn, or string, or hemp...or even ribbons and beads.  Go crazy! 
I need to add a photo of a favorite of mine for wedding treat bags that I did- white organza bags, pink silk ties with beads and silver trinkets dangling.  Oh so cute!

Recently my SIL asked me to make her a set of alphabet bags for her preschool class. 
These were a lot of fun, and a great way to dig into some of my stash that I had forgotten about.


There are numerous tutorials online for many different types of drawstring bags/fabric gift bags.
I've been asked several times on how I do a basic drawstring, so I thought I would post a tutorial.
So here is how I do my basic drawstring bags. 
At the end is a little help on creating variations (such as handles, lining, etc.) 
Please feel free to use however you like EXCEPT please do not post this tutorial as your own or charge for it.

Happy Sewing!
-Ronna


Ronna's Drawstring Bag Tutorial

Step 1:
Cut out your pieces.  All this is determined by of course, the size of bag you wish. 
Just remember to cut the pieces + seam allowance. 

Seam allowances:
Main Bag Sides (Width): 1/4" added when cut on fold. 1/2" added if not cut on fold. 
Adjust accordingly to the size of seams you create. 
I usually add 1/2" for the side seam so that I can do a french seam.
Main Bag Bottom/Top: 3/4" added.  (1/4" for the bottom seam + 1/2" for the top) =3/4" added)
Again adjust accordingly to the size of the seams you create.
For these unlined bags, I do a basic seam along the bottom (zigzagging over the edges) as no one will really see the bottom of the inside. For the top I do a basic fold over 1/4" twice and top stitch.  You can get creative here thou and create some very pretty hems, embroidery, added lace or ribbons. So just remember what you adding before you make your final cuts. 
Placket: Cut on fold, the width of your bag. 1/2" added to the top/bottom.
Again adjust accordingly to the size you wish for your bag.  I like the looks of  2" if the lettering/applique is large.


So for example: I want a bag to measure 8" wide & 10" tall. 
I would then cut my main piece (on the fold) 8 1/4" wide & 10 3/4 tall.
My placket would be 8" wide and 2 1/2" tall.
Make sense?
Okay let's continue...


Piece A: The main bag. Cut on fold.  
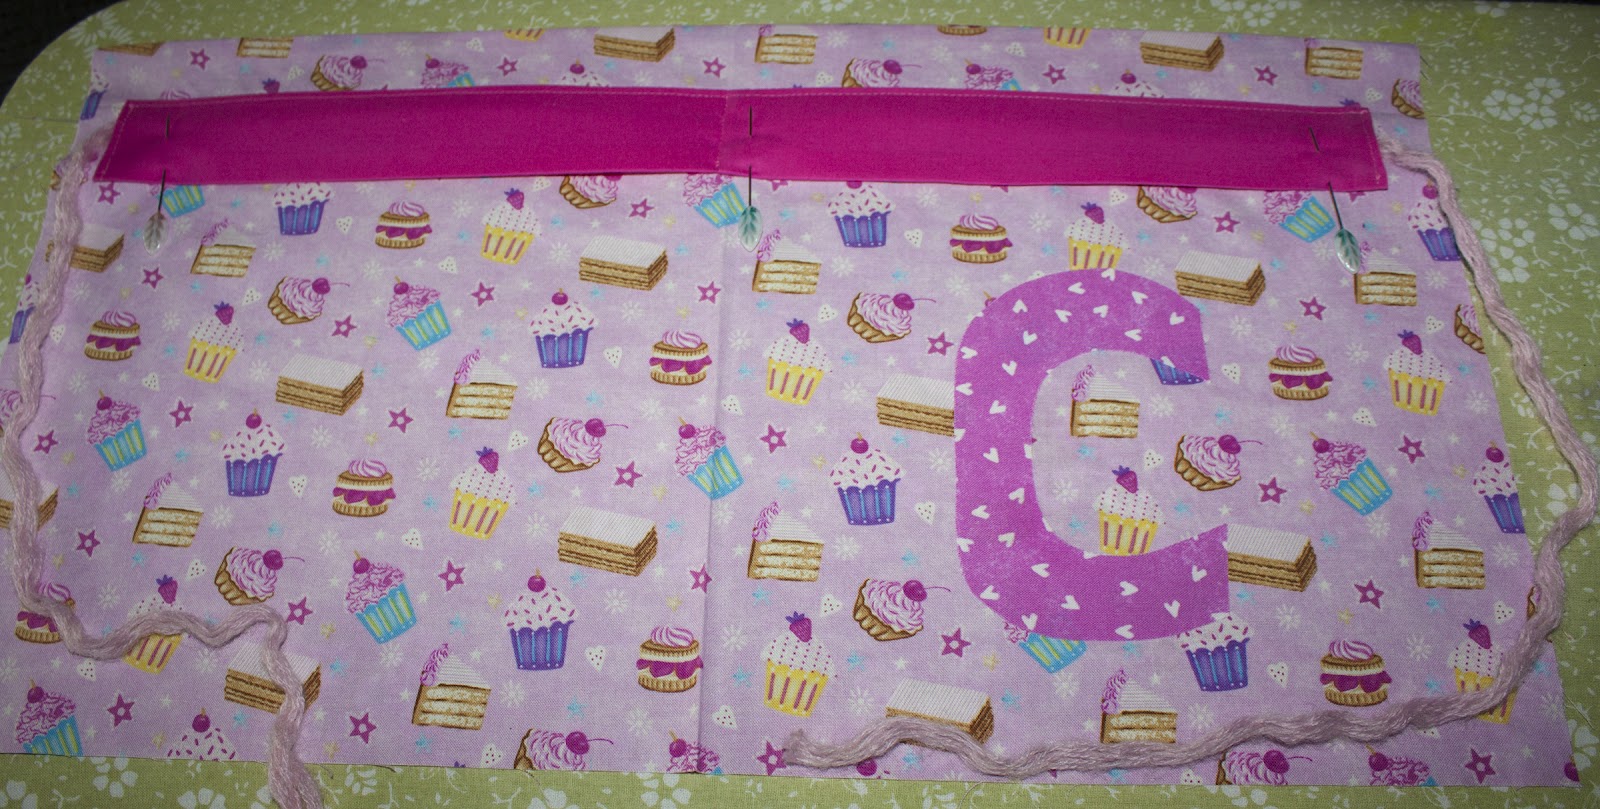
Piece B: The placket. This encases your drawstring.
Piece C: The letter/number/applique. 
Piece D: The yarn or string for the drawstring.


Step 2:
Press down your top fold.  (Fold down 1/4" press, fold again 1/4" press)
Prepare your placket by pressing under 1/4" on top and bottom. 1/2" on each end.  I like to then add some fusible interfacing, it tacks down those edges and makes sewing easier.  You can also top stitch the ends if you like.
Pin the top of the placket to the front piece. I usually do about 2" down, giving just enough of a ruffle of the main fabric at the top when the bag is drawn & tied shut.  Stitch the placket to the main bag piece along just the TOP of the placket.
 Next take the center of your string/yarn. Hold up the placket at the center, tucking the center of your yarn underneath.

  Fold the placket back down over the yarn and stitch.  This holds your yarn in place and the drawstring won't be able to be "yanked" out of the bag!

 Next pin down the bottom of the placket, being sure to tuck the yarn out of the way!  Stitch in place.

 Step 3: Add the applique to the front.  Follow the directions of the fusible webbing you use.

 Step 4: Sew the side of the main bag together. I like to do a french seam here. This makes the side seam pretty with no loose edges/serged seams showing.  To do this: Turn bag so that the right sides are out/wrong sides together. Sew a 1/4" seam. Trim close.  Turn inside out/right sides together. Sew a 1/4" seam, enclosing the previously sewn seam.


 Step 5: Sew the bottom seam.  Turn inside out/right sides together. Sew along the bottom of the bag, being sure to back-stitch and sew at least twcie to "reinforce".  You can also serge or zig-zag this seam. Trim edges. Turn back back right-side out.


 Step 6:  Turn right side out and press. Knot and trim the ends of your yarn.
(If you are worried about this, tie it first then trim according to the length you wish)

 C is for...cupcakes!


 And tied closed!  
Awww. See, so many possiblities in making your own drawstring bags!

Thank you for using my tutorial! I hope that it was a help to you in creating your own drawstring bags.  


I will post a followup to this tutorial tomorrow with various additions such as handles, lining etc.


Tuesday, August 21, 2012

Cell Pocket Tutorial for an outdoor chair

This is my Cell Pocket Tutorial for an outdoor chair. 
If you have any questions, please don't hesitate to ask!  
I created this tutorial for a HTC OneX, 
you can adjust the size for your cell, a e-reader, or iPad.  
These make incredible gifts!  
The extra pocket is great for ear-buds etc. 


 I have posted this tutorial for FREE.  
You may repost, share, etc...
but DO NOT charge for my tutorial/pattern. 

Step 1:  Cut out your pieces.  

(As I stated, these pieces I cut are to fit my cell. Adjust the size for what device you wish to create the pocket for.  Adding 1/4" or so to each side for the seams.)
Back Piece: 5 1/2" wide & 7 3/4" tall
Front Piece: 5 1/2" wide & 7 3/4" tall
Front Pockets: Inner Pocket 5 1/2" wide & 10 1/2" tall
Front Pocket 5 1/2" wide & 9 1/2" tall 
(For the frontmost pocket  I leave this piece a bit longer and wait to trim the end off as I lay it on top of the inner pocket. That way I can adjust it to be as tall as I wish. 
AND in the photo I have the pockets & button flaps already folded in-half.)
2 Button Flaps: 2 pieces 2" wide & 9" long 
(You will want to adjust the LENGTH of the flap pieces for your chair rail.  This is made to fit our  ÄPPLARÖ from IKEA outdoor chairs.)


Step 2: Interfacing & batting.

Add interfacing to the back piece, along with a piece of batting.  I sew a few lines across (I call it quick-quilting) to keep the batting held in place. You won't see this, as it will be against the chair.
Fold the two pocket pieces in half, adding interfacing inside each piece. 
Add interfacing to the button flap pieces. Then fold in half, sew down the two sides, leaving the end open to turn. Turn right-side out and press.  
I use my Great-Aunts paper press to "poke" the corners out.  This is best tool I've ever had & keep it always beside my machine. 


Step 3: Pockets

Top stitch along the top fold of the pocket pieces.  Place the inner pocket on top of the front piece and stitch along the sides and the bottom.  Place the front pocket on top, adjusting for the size of inner pocket "peeking" out as you would like, trim the extra fabric from the BOTTOM (not the top fold that you have top stitched.)  Now sew to the front piece, sandwiching your inner pocket.


Step 4:  Button Flaps
Top stitch around the edges of the  button flaps if you wish.  
On one of the flaps add your buttonhole, and on the other flap your button.  
Connect together as shown.


Step 5:  Sew pieces together

Sew the button flap to the top of the front piece at the center.  
Make sure that the button is thru the button hole flap (connected) and is facing DOWN towards the front piece. (SO technically you are sewing the buttonhole end of the flap to the top piece)
Stitch along the top (I stitch a few times to reinforce it).


Next add the back piece on top with right-sides together, stitching along the top. 
When you "open" the top piece you will have this...


 Now fold it so that the wrong sides are together and the button flap is straight out.  Press.


Step 6: Finishing the button flap

Now we are going to attach the other end of the button flap to the back piece.
Fold it down like pictured, making note of where it lays to give you enough tension/size for your chair rail.
PLEASE NOTE: when sewing to the back piece, pull the pieces back out, so that you won't be sewing thru to the front piece as well! 
I sew a rectangle with a X in the middle. Just something a bit more than a single stitch line to reinforce it.

When finished, viewed from the backside.


Step 7: Sewing Front to Back

Now fold back so that the back piece is on top of the front piece. 
The pockets and button flap sandwiched inside, with right sides together!  
Sew around the edges, leaving an opening at the bottom for turning. 
Clip corners & trim edges if needed.


Step 8: Finishing Up

Next, turn it right side out.  I reach in and pull gently on the button flap, pulling it thru the opening and then turning right side out.  Gently poke the corners out.  Press the front and back. 
Now I like to slide in a piece of cardboard covered inside batting for extra support. (I cut the cardboard approx. 5" wide & 7" tall). You can skip this step if you'd like, as the interfacing will still give it a bit of stability.
Press the bottom, folding in a bit along the opening you left for the bottom seam.
Then  top stitch along the bottom, catching the seam you just pressed in.

Viola! There you have it, a cell pocket for your outdoor chair!


Please let me know what you create using my tutorial!  
Tag me on flickr, or comment below!


Our outdoor chairs are ÄPPLARÖ from IKEA. We LOVE LOVE LOVE them!  
And yes, I made the pillows myself! 

Wednesday, August 8, 2012

Two Superhero Nephews

Awhile back I created capes for our nephews...
Now they have a selection of Superhero Masks 
and each a wallet with there very own Superhero ID card!


I didn't do anything fancy, just a basic fold wallet with a zipper for change/money and a pocket behind for their ID cards.  A hook on the side so they can attach them to their belts or backpacks etc.


For the ID cards I created a template in Photoshop and just created a basic superhero text for the top. Added their names, favorite colors, and their power.
I had to add to the back "Provided by the Superhero Authority" for laughs :)  


I used the templates found at Cutesy Crafts except that I decided to use t-shirt cotton instead of felt.  The boys live in California, and running around getting sweaty with felt against the face just seemed itchy to me.  I also added a lining of interfacing for stability and batting for thickness.  Felt would have indeed been easier to use considering the edges fraying with material...but I'm happy with the way they turned out.  


Wednesday, June 6, 2012

Yay for Bright Bright Colors and Soft Yarn!


Yay for Bright Bright Colors and Soft Yarn! 


I created these Girls Sized Legwarmers for a gift, so hopefully I will have a photo soon to share of them on some cute legs!

As always, feel free to use my pattern. You may not resell or distribute though! 
For those of you who  have asked if you can create & sell via your Etsy Shops items from my
patterns: Yes! But please have the respect for the time I spent creating & posting this to share with you BY adding this Blog Post to your Item Description (stating that the pattern is by me).  
Thank you!  

Happy Hooking!


Here is the pattern I created:
 
Top Ribbing: Hook G. Light Pink. Basic top ribbing pattern. I did 13 sc tall, SC BLO back & forth until it was 36 sc's around.  SL ST together.  SC around (36 SC's) twice. (Many tutorials online to help you with this!)

Main Body: Hook H. Continue working down the body of the legwarmer, joining to beginning stitch at the end of each round.  Start each round with CH1 if it makes your yarn/rounds more plyable/finished.  Sometimes I just continue to the next round, it's up to what makes yours feel/work right.  For my Popcorns I use 4 HDC's.
  1. Switch to Blue.  SC around (36 SC's)
  2. CH 2 (counts as 1st HDC), HDC around (36 HDC's)
  3. SC around (36 SC's)
  4. Switch to Red. SC around (36 SC's)
  5. Switch to Bright Pink. SC around (36 SC's)
  6. CH 2 (Counts as 1st HDC), * Popcorn, 2 HDC's; repeat from * around ending with 1 HDC
  7. SC around (36 SC's)
  8. Switch to Red.SC around (36 SC's)
  9. Switch to Blue. SC around (36 SC's)
  10. Repeat round 2
  11. SC around (36 SC's)
  12.  Switch to Light Pink. SC around (36 SC's)
  13. SC around (36 SC's)
  14. SC around (36 SC's)
  15. Switch to Turquoise.  SC around (36 SC's)
  16. Start basic zig-zag stripe pattern for ruffle.  (Rows 1, 2, and 3) tie off.
  17. Underneath/backside, Attach Light Pink to top row of Turquoise.  SC around (36 SC's)
  18. Continue SC around. (36 SC's)
  19. Repeat 18
  20. Repeat 18
  21. Repeat 18
  22. Repeat 18
  23. Repeat 18
  24. Repeat 18
  25. Switch to Red. SC around (36 SC's)
  26. Switch to Bright Pink. SC around (36 SC's)
  27. Switch to Light Pink. SC around (36 SC's)
  28. Switch to Red. SC around (36 SC's)
  29.  Switch to Bright Pink. SC around (36 SC's)
  30.  Switch to Light Pink. SC around (36 SC's)
  31.  Switch to Red. SC around (36 SC's)
  32.   Switch to Bright Pink. SC around (36 SC's)
  33. CH 2 (counts as 1st HDC), * Popcorn, 2 HDC; repeat around from * ending with 1 HDC
  34.  SC around (36 SC's)
  35.  Switch to Light Pink. SC around (36 SC's)
  36.  CH 2 (counts as 1st HDC), * 1 HDC, Popcorn; repeat around from * ending with Popcorn.
  37. SC around (36 SC's)
  38. Switch to Bright Pink. SC around (36 SC's)
  39.  CH 2 (counts as 1st HDC), * Popcorn, 2 HDC; repeat around from * ending with 1 HDC
  40. SC around (36 SC's)
  41.  Switch to Red. SC around (36 SC's)
  42.  Switch to Light Pink. SC around (36 SC's)
  43.  Switch to Bright Pink. SC around (36 SC's)
  44.  Switch to Red. SC around (36 SC's)
  45.  Switch to Light Pink. SC around (36 SC's)
  46.  Switch to Bright Pink. SC around (36 SC's)
  47.  Switch to Red. SC around (36 SC's)
  48.  Switch to Light Pink. SC around (36 SC's)
  49. SC around (36 SC's)
  50.  SC around (36 SC's)  
Switch back to Hook G.  SC around (36 SC's) twice.  Continue on to bottom ribbing, using basic SC into BLO technique.  Tie off and weave/trim the ends of loose yarns on the inside.

For the tie at top, SC length you want, tie off ends/knot.  Weave thru bottom of the top ribbing.


 The ZigZag Stripes Pattern ended after the basic Rows 1(in Turquoise) 
Rows 2 & 3 (in Bright Pink).  It gives a nice ruffle to the legwarmer. 


Monday, June 4, 2012

Lap Blanket


I picked up a great sock-weight wool blend yarn thinking to create a little scarf or hat.  
Then I stumbled upon a Japanese Square Block Pattern called Ondori Crochet Motif 3.  
It would be perfect in this soft lightweight yarn for a great lap blanket! 

So there I started, creating square after square!  
I decided to whip it together using the basic- (sc thru both squares, ch3. with a double FPdc at the ends of each row).


Then I added a few rows around the outside in purple and red, continuing into a basic  pretty little edging.


Here it is all finished!  I so love how it turned out!  
Beautiful squre motifs held together in a simple way in a beautiful yarn! 
 I've sent it off to it's new home at my Mother-in-laws house.  
She is also an avid reader, so I hope it finds a new home on her lap during those blanket moments. 


Tuesday, May 29, 2012

Legwarmer Ideas Brewing


I'm love love loving the legwarmer craze for little girls!  One sees them everywhere!  
So while I was staring into my basket o' yarn, I thought hmmm why not create a few fun patterns...and create some.  

Here is the first set that I came up with.  I love popcorns in this soft yarn, they really pop!
I used Deramores Stylecraft yarn.  Lately it is my absolute favorite.  
It is super soft and the colors are awesome! 

Below is the pattern for what I did.  As always, feel free to share, use, and create.  
All that I ask is that you DO NOT SELL any of my patterns! 
 It came freely from my head and is to be shared FREELY for all.  
 Links to this post are welcome as sharing.  

Happy Hooking all! 


My Legwarmer Pattern  1


This is basically what I did.  For those who do not know basic crocheting: there are many many youtube videos, helpful blogs, and instructional sites to help you get started. 
 
For the top ribbing: Hook G (Or whatever works best with your yarn to give you the right tension for a cuff) I just did the basic crochet ribbing pattern.  If you need more help with this, there are  numerous tutorials on crochet websites & youtube to follow along. 
SC a length you want for the height of your ribbing
SC in 2nd CH from hook and continue across, turn.  
CH 1, SC in BLO across, turn. 
Repeat this basic process until your ribbing is the length you need for your "top cuff".  
For this size I did 24 rows, giving me a count of 24 to begin the main body.
Join by folding together and sl st together.  You now have your top cuff.

Main Body:  Hook H (Switch to one size larger than the cuff) Now you are working down the legwarmer from the top cuff, spirals downward. 
Round 1.  SC around the ribbing circle (24 SC's)
Round 2. Switch color, HDC into 1st SC, HDC around, join. (24 HDC's)
Round 3. CH 2 (counts as 1st HDC) HDC around, join.  (24 HDC's)
Round 4. Repeat round 3
Round 5. Switch color. SC around, join. (24 SC's0
Round 6-8. Switch color. Repeat round 3.
Round 9.  Switch color. Repeat round 1.
Round 10. CH 2 (counts as 1st HDC) *POPCORN, 2 HDC; Repeat from * around, ending with 1 HDC. Join to top of beginning HDC (CH 2)
(If you adjust the size/count, you will have to adjust this row to work for your size.  I did this to equal 2 HDC 1 POPCORN around)
Round 11. Switch color. Repeat round 1.
Round 12.  CH 2 (counts as 1st HDC), HDC, * POPCORN, 2 HDC's; repeat from * around, ending with a popcorn.  Join.
Round 13. Switch color. Repeat round 1.
Round 14. CH 2 (counts as 1st HDC of POPCORN stitch) *POPCORN, 2 HDC's; repeat from * around, ending with 2 HDC's, join.
Round 15. Switch color. Repeat round 1.
Round 16. CH 2 (counts as 1st HDC) * POPCORN, 2 HDC's; repeat from * around, ending with 1 HDC, join.
Round 17. Switch color. Repeat round 1.
Round 18.  CH 2 (counts as 1st HDC) 1 HDC, * POPCORN, 2 HDC's; repeat from * around, ending with a popcorn.  Join
Round 19. Switch color.  Repeat round 1.
Round 20.  CH 2 (counts as 1st HDC of POPCORN stitch) *POPCORN, 2 HDC's; repeat from * around, ending with 2 HDC's, join.
Round 21.  Round 19. Switch color.  Repeat round 1.
Round 22.  CH 2 (counts as 1st HDC) * POPCORN, 2 HDC's; repeat from * around, ending with 1 HDC, join.
Round 23.  Round 19. Switch color.  Repeat round 1.
Round 24.  CH 2 (counts as 1st HDC) HDC around, join.  (24 HDC's)
Round 25.  CH 2 (counts as 1st HDC) HDC around, join.  (24 HDC's)
Round 26. Switch color.  Repeat round 1.
Round 27.  Switch color.  Repeat round 1.
Round 28.  CH 2 (counts as 1st HDC) HDC around, join.  (24 HDC's)
Round 29. CH 2 (counts as 1st HDC) HDC around, join.  (24 HDC's)
Round 30.  Switch to ribbing color.  Repeat round 1.

Bottom Ribbing: Switch back to Hook G (or whatever smaller hook you used for the top ribbing). CH the same amount you used for the top ribbing, SC into 2nd CH from hook and in each across, SL ST into the body of the legwarmer (next SC stitch in Round 30).  Turn.  
SC into BLO of the ribbing stitches across, Turn.  Continue on as such until you reach your foundation row for the bottom ribbing.  Join by SL ST together.

There you have it!