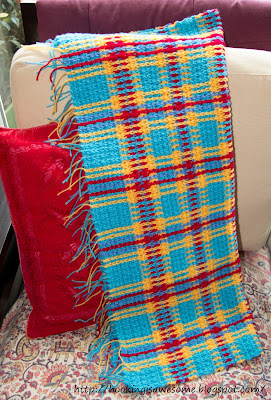
So I decided (after following one pattern and having to expand the size of it for my liking) to create my own pattern in the size and striped pattern that I wanted.
The yarn I love using is Deramores Stylecraft. I picked the colors Aster, Aqua, Lipstick, and Saffron for this blanket. They really stand out together and are awesomely bright for a baby boy blanket in which I was creating!
Front of Blanket
Back of Blanket
For those of you who need more instruction than my basic steps,
please search "how to crochet" online via basic search or thru youtube.com!
My Hooked & Woven Baby Blanket Pattern:
Step 1:
Using Hook US G6/4.00MM ch 143
Row1: dc in fifth ch
from hook (this is your first dc and ch1) *ch 1, skip 1 ch, dc in next ch. Repeat from * across to end with dc. Ch 4 (counts as dc & ch1) and turn for next row.
Row2: *dc in dc, ch 1. Repeat across, ending with dc. Ch 4 and turn.
Repeat this pattern creating your "mesh" background using Row 2 until you have a total of 67 rows.
This gives you a "mesh" background of 70 "squares" wide & 67 "squares" tall.
(Mine is approx. 28" square.)
Be sure to weave in the ends of your yarn at each start of a new color, as this saves you time later! Unless you plan on adding an edging to your blanket that will work them all in.
Be sure to weave in the ends of your yarn at each start of a new color, as this saves you time later! Unless you plan on adding an edging to your blanket that will work them all in.
Color Pattern for "mesh" background: 8 rows Aqua, *2 rows Saffron, 1 row Lipstick, 1 row Aster, 1 row Lipstick, 2 rows saffron, 4 rows aqua, 2 rows Saffron, 1 row Aster, 1 row Lipstick, 1 row Aster, 2 rows Saffron, 4 rows Aqua, repeat from * ending with 8 rows Aqua
Step 2:
Using Hook US H8/5.00MM Start your rows of weaving. To do this you are simply doing a row up sl st's up the mesh background. (color pattern at end of photos)
The first patterns that I found do this process, using vintage crochet sites, were just printed out words and I was at a loss! So here are some photos to help you along!
You make your slip knot & insert hook into first "square" of the mesh.
Draw up a loop, and keep working into the next "square".
SL ST each time and working your way upwards from the bottom first row of the blanket.
Be sure to hold your yarn behind your blanket, or you will have a tangled mess!
This is what takes some getting used to, but once you get
the hang of it, it's a very fast process! Also keep it loose, you will want this to be worked loosely, or you will end up with a tiny tight blanket. (I loose about 4" in the height during the "weaving" step, so keep it loose!)
The stripes pattern for Step 2: Starting from the far bottom left corner of the blanket, work from left to right.
*4 rows Aqua, 2 rows Saffron, 1 row Aster, 1 row Lipstick, 1 row Aster, 2 rows Saffron, 4 rows Aqua, 2 rows Saffron, 1 row Lipstick, 1 row Aster, 1 row Lipstick, 2 rows Saffron,
*Repeat to edge at right-side ending with 4 rows Aqua.
For those of you who notice the pattern/or are overly OCD about things...you can adjust this so the pattern is centered. I.E. the red/aster stripes start and finish with offsets.
Next go thru and knot each start/end of the stripes rows. You can weave them in & trim, or leave them hanging as I did. I did, as I mentioned, gave each one a good double-knot and then trimmed them all neatly the same length. This gives it a nice fringe, just like the Scottish Plaid blankets that this is patterned after. Or you can add your own edging pattern, simple or extreme...up to you!
Finished!
Approx. 28" wide & 24" tall
I hope that this is easy for you to understand and helps you create a quick & very pretty patterned woven blanket! Please feel free to share your creations, sell your creations, etc.using my pattern.
Just please do not sell my pattern. Please link back to here for my pattern.


No comments:
Post a Comment